Sunday, August 17, 2008
We're Moving! (URLs, that is)
Our new URL is http://knittyprofessors.blogspot.com. Please come and add our new feed to your reader.
This blogspot address will turn into a forwarding service for our readers.
Our new site isn't as pretty as it will be, but it's much more versatile, and we like it. We hope you will too.
-Katie and Jordynn, the knitty professors
Wednesday, August 13, 2008
Teddy Bear Rollneck Sweater – Free!
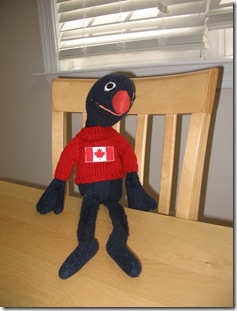
This summer Grover received this lovely sweater as a gift.
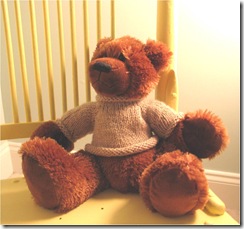
He liked it so much he asked for another sweater to wear. So I designed the Teddy Bear Rollneck Sweater:
The Teddy Bear Rollneck Sweater is worked from the top down, using raglan shaping. No seaming required! The rollneck is simply formed by knitting everything in stockinette, with no ribbing or borders. This makes it a super easy and quick knit, because after all… it is for a teddy bear.
GAUGE:
18 sts & 26 rows over 4”
FINISHED MEASUREMENTS:
Approximately 4 inches long and 6 inches wide. Should fit any medium‐sized bear. (For reference, the bear in the picture measures about 8” tall when sitting).
MATERIALS:
Needles:
Size 8 (5mm) circular needles (16”)
AND EITHER an additional size 8 (5mm) circular
OR double-pointed needles in size 8 (5mm)
Paton’s Classic Wool Merino, approximately ¼ skein (or probably less). Any worsted weight yarn will do. Shown in 00229 (Natural Mix).
PATTERN NOTES:
The Teddy Bear Rollneck Sweater is worked from the top down, using raglan shaping. No seaming required! The rollneck is simply formed by knitting everything in stockinette, with no ribbing or borders. This makes it a super easy and quick knit.
PATTERN:
Using doublepointed needles or double circular method, cast on 36 stitches. Join to work in round. To shape the collar, knit in stockinette stitch for 9 rounds.
Begin raglan shaping:
Place markers: k3, pm, k12 (front), pm, k6, pm, k12 (back), pm, k to end of round.
Start raglan increases: *k to 1 st before marker, kfb, sm, kfb; rep from * to last marker, k to end of round.
Repeat raglan increases on every round for 8 rounds.
Separate sleeves: Place sleeve stitches on scrap yarn.
Join and work body in round for 2.5” or until desired length. Bind off.
Using doublepointed needles or double circular method, move sleeve sts from scrap yarn to needles and begin working in stockinette stitch. At the end of the first round, pick up 7 stitches under armpit. Continue working in stockinette stitch, only decrease two stitches on the following row and every other row for 3 times total , as follows: K1, k2tog, knit to last three stitches of round, ssk, k1.
Continue until sleeves measure 2” from armpit, or desired length. Bind off.
FINISHING:
Weave in ends. Block if desired. But seriously, are you really going to block something that goes on a stuffed animal?
Sunday, August 10, 2008
Who am I kidding.
There are so many folks out there who like knitting socks, and who are good at it. I need to put down the dpns, and back away.
I'm going to make baby hats instead.
Thursday, August 7, 2008
Recycled Plastic Bag Crochet Tote - free pattern recipe
There are a lot of patterns and instructions for recycled plastic bag crochet out there, I'm just adding to the fun with this post and pattern.
This is a bag that I assisted my friend C. in making: a market bag with long straps, made of grocery bags (in white and brown) and target bags (the red speckles).

There are two reasons to crochet with plastic bags that currently apply to me: (1) because a crafter is on a yarn-purchase moratorium because said crafter's HVAC needs to be replaced, and (2) because a crafter wishes to be eco-friendly in a really flipping fun way.
What you need for plastic bag crochet
1) plastic bags - way more than you think
2) crochet hook - larger the better (within reason)
3) scissors - for cutting plastic bags
Overview
Crocheting with plastic bag yarn is a two-step process. First, you have to make the yarn, then you have to crochet it into a project of your choice. Projects can be bags (a postmodern reconfiguration of a highly wasteful object into one that we dub "eco-friendly"), bath mats, doggie beds, or anything else.
MAKE THE YARN
The yarn-making process involves cutting the bags into long loops of plastic, then threading the loops together to make a two-ply plastic yarn.
Get those bags and a pair of scissors. Lay a bag as flat as possible, then fold the bags in half length-wise twice or three times, until you can cut across the width with one snip of your scissors. First cut across the top to remove the handles. Then, cut across the bottom to remove the base. You now have a plastic tube which you will cut into loops.
A note about gauge
Depending on the size crochet needle you have, and your desired gauge, you can make this yarn thicker or thinner.
Another factor is the heft of the bags you are recycling. Some grocery store bags are much thinning than bags from department stores.
Here's a very arbitrary gauge chart, with suggested needles. The inch measurement refers to the width you will cut your loops:
.5"/thick bag or 1"/thin: Light weight. Size K (6-6.50)
1"/thick or 1.5-2"/thin: Medium weight. Size P hook. (10-11.5)
2"/thick or 2.5-3"/thin: Heavy weight. Size Q hook. (15-16)
When pairing yarn to your hooks, remember the proper pairing depends on (1) your personal crochet tension, and (2) how tight you want the work to be. I would suggest that you work this material tightly, though, to make a stronger fabric.
To attach the loops to make yarn
I know this sounds confusing, but it's a lot easier when you have the yarn in front of you to work with.
Lay one loop on the ground, then lay the second loop on top of it, overlapping slightly. Reach through the top loop and grab the edge of the bottom loop, pulling it through, and then thread this end over the top loop and through itself, i.e., through the bottom loop. Pull tightly, and the loop-over connects the two loops. Continue attaching the loops like this until you have a large ball. (And I mean large--like 1 foot in diameter.)
CROCHET THE BAG
I've prepared a simple bag pattern recipe. This is a tote with handles, not straps like the bag in the picture above.
The pattern presumes that you know how to single crochet flat and in the round.
Work the bottom of the bag
Chain (ch) about 16 inches. This length will be the width of your bag, so chain as many as you want depending on the size bag you would like to make.
Crochet flat with single crochet (sc) for 4-5 inches. This is the depth of your bag. Again, make it as large as you would like.
You will work the sides of the bag in sc. You will now work in the round, around the four sides of the rectangle you just made. As you work in the round, the bag will grow taller. Work for as long as you would like, creating the height of a bag you will want to use--18"-20" is what I recommend.
Work bag handles
First, you need to decide how wide you would like the handles to be.
Second, you need to figure out how to center that width on the width of your bag's long sides.
When you work the handles, you will sc as normal until the start of the handle, then ch as many sts as there are sts for the handle width, then reconnect and sc to the other handle location, repeat handle chain sts, and work to end of round.
The next round you will work in sc including across the chain.
Work in sc until the handle height measures 2-4 inches. Any less than 2 inches may sacrifice handle strength. Wider than 4 inches makes the handles difficult to grab.
You are finished! Tie off, weave in ends using your crochet hook.
Here's a ridiculous schematic I drew. I should stick to CAD software.

Monday, August 4, 2008
Free Pattern: Flower Power & Hexagon Crochet Coasters
Hexagon Coaster,
or Flower-Power Coaster
Materials:
Some worstedish weight 100% cotton
Shown here: Euro Yarns Brushstrokes Cotton in color #103. One skein (120 yards) will make a set of
USH8/5.00mm Crochet Hook
Chain six sts.
Join to work in a circle.
Round 1: Work 2 sc into all six sts.
Round 2: *sc, 2 sc into next st*; rep **
to end of round.
Round 3: *sc, sc, 2 sc into next st*; rep ** to end of round.
Round 4: *sc 3 times, 2 sc into next st*; rep ** to end of round.
Round 5: *sc 4 times, 2 sc into next st*; rep ** to end of round.
[For Flower Power, skip to separate instructions below.]
Round 6: *sc 5 times, 2 sc into next st*; rep ** to end of round.
For Hexagon, you are done.
For Flower-Power:
Round 6: *ch 5, sc into 3rd st*; rep ** to end of round.
Fini
A Hint: As the work grows, you are working 2 sc into the middle of the 2 sc on the row below. You don't really have to count st, just watch the row below for the st with 2 sc in it, and put 2 sc there.
Work it bigger to make a trivet or potholder.
Note: I hereby grant permission to members of the Durham String Thing knitting group to make these for our Centerfest Show sale and for charity sales.


