Showing posts with label tutorial. Show all posts

Tuesday, January 5, 2010

Photographing Knitting - Lesson 1

I'm sure most of you will agree that one of the most enjoyable aspects of reading knitblogs are the photographs.

I wanted to share some ideas about photographing knitwear and yarns with the rest of you, in light of my recent purchase of the best lens ever (BLE).

First I'm going to talk about some gear. Then I'm going to talk about some photography concepts.

GEAR:

Here's what you need to take perfect pictures of your knitting:

1. A digital SLR with manual mode.

2. A lens with an f-stop of 1.4.

Now, you can spend $2000 on this kind of set-up, or you can spend $400. I bought my Nikon Nikkor 50mm 1.4 lens, the BLE, for $100 on Ebay. I use it with my Nikon D80, which you can get for about $600 used. The D40 or older digital SLR models work fine, too. You only need to have a manual mode.

The most important thing to keep in mind when photographing anything is LIGHT. Natural light is best. Light from a flash is most tricky to get right.

The 1.4 aperture on my BLE lets in a TON of light, so that you can take great pictures even when the light is low, and you rarely need a flash.

Before we go on to lesson 2, you need to learn about the relationship between (2) aperture and shutterspeed, and (2) aperture and depth of field.

Read about aperture here.

Read about depth of field here.

In summary: the larger the aperture opening in a lens, the more light enters the camera AND the shallower the depth of field becomes. Professional photographers use shallow depth of field to make their subjects "pop" from the background in a photograph.

For example, here's a photo of my son, Adrian:


Using a 1.4 aperture, his face is the only thing in focus--the bed, the pillows, the pile of laundry behind him, his cute bare bottom--it all fades. Which means that you don't have to have a fabulous studio backdrop to take great photos.

Here's another example. This is a photo of some of my hand-spun:


The sexy backdrop? My floor.

One more example--Jordynn, modeling her (free!) pattern, the Greywacke Cowl:


This one was taken on my front porch. That's my neighbor's yellow garage in the background. It is amazing how much the background doesn't matter when you have a shallow depth of field.

Next time, we'll talk about photographing knit garments.

Friday, December 25, 2009

Free Tutorial: Bust Dart Shaping for Top-Down Sweaters

There are a number of bust dart tutorials out there, and many of them are wonderful. But it occurred to me that I might provide the instructions from my Celia Cruz pattern here. I find myself turning often the the worksheet I designed for that pattern. Most recently, I've been working on the Backward's Cable Pullover (only my cable is going in the front), and I'm just at the point of adding bust darts. So here's an adapted version of that worksheet, which you can use for any sweater where you'd like a better fit.

The Basics

There are two types of bust darts: vertical bust darts and horizontal bust darts. Vertical bust darts add width, and they start from the side seams (or close to the side seams). If you are working top down, you increase one stitch on each side, moving that stitch in towards the center of the sweater. You can see the vertical bust darts in the image below, which create a wedge shape on the side of the sweater.

Horizontal bust darts add length. For vertical bust darts, you will add short rows in the center of the sweater, working back and forth from side to side (usually beginning at or near the bust point).

For a fitted sweater, especially, both kinds of bust darts will help to ensure a good fit.

Sizing: Before you cast on for a sweater, measure your chest size at the narrowest part, above your bust. Choose the pattern size closest to that measurement, not your actual bust measurement. This will ensure that the sweater fits properly in the arms/neck area. You will create more room in the bust area using bust darts.
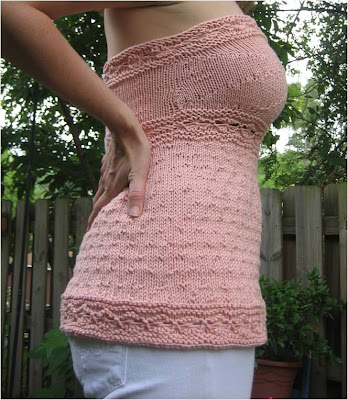
The Math

To plan out your bust darts, you will need to do a few calculations. (Ask a friend to help you take good measurements, and write them down. Keep these on hand for next time).

Vertical Bust Shaping Worksheet

Fill in the numbers for the following:

A: Size of garment you are knitting (according to pattern measurements): _____ (i.e. 36” size)

B: Your actual bust measurement at fullest point: ____ (i.e. 39”)

C: Difference between A and B: ____ (i.e. 3”)

D: C times the # of stitches per inch in your gauge (i.e. 4.5 stitches): _____. This is the total number of stitches to add in width. (If it’s an odd number, add 1).

E: D divided by 2=____. This is the number of stitches to add on each side.

For example, say I’m knitting a size medium (36”) pattern but my actual bust measurement is 39”. I need to add 3 inches of width. Using my gauge, I calculated that this meant I needed to add 13.5 stitches. I add 14 just to make it an even number, or 7 on each side of my side seam markers. That means 7 rounds of increases. These vertical bust darts will move out on a diagonal from the side seam, to create a pleasing dart line. If you prefer, you can line up the increases above and below each bust point, or simply do them near the side seams.

Work the Vertical Bust Darts into the Sweater Pattern

Work the sweater pattern until it reaches just above the fullest part of your bust. (Try on your sweater frequently so that you don’t start the increases too low).

Begin vertical bust increases (to add width).

Refer to the worksheet, above.

First round: k1, m1, k to 1 sts before side marker, m1, k1.
Following round: k3, m1, k to 3sts before side marker, m1, k3
Round 3: k5, m1, k to 5 sts before side marker, m1, k5

Continue as above until you have added as many stitches as indicated in line E on your worksheet.

If you are working a stitch pattern other than stockinette, you can try to work the increases in somehow. You will decrease at the same point later on. For example, in Madame Wu, I added vertical bust darts by expanding and then decreasing the purl rows in the rib pattern:

empresswu 003

Once you are finished with the vertical bust shaping, you will begin the short row shaping. (Or, you can skip to vertical bust decreases, below).

Horizontal Bust Shaping Worksheet (Short Row Shaping)

A: Take your vertical measurement from shoulder to waist:
1. Front: ____”
2. Back: ____”

B: Subtract A2 from A1: ____” (This is how much extra you should add on the front.)

C: Multiply B by the number of rows/inch in your gauge (i.e. 6 rows/inch): ____

D: Divide C by 2: ____ . Add one: _____ This is the number of rows to add (or the number of “wraps”).

E: Try on garment and place markers at apex of each breast (i.e. bust point). These will be your side wrap markers. Take off garment and make sure bust point markers are equally
spaced from side seams.

Count the number of stitches from the side seam to the bust point marker: ____ sts

F: Divide E by D: ___ This is the number of stitches to do between wraps (approximately)—you’ll round up or down.

For example, say I need to add 3” to the length of my sweater. If my gauge has 7 rows per inch, that means I need to add around 10 rows. If I have 25 stitches on either side of my bust point marker, then I’ll work approximately 2 stitches between wraps.

Work the Horizontal Bust Darts into the Sweater

If you have not done short row shaping before, you can look at KnittingHelp.com to see how to do a basic short row.

wrap and turn (W&T): Bring yarn to the front of the work, Sl the next st from the left hand needle, move your yarn to the back of the work, Sl the st back to the left hand needle.

Wrap 1: Work to left side wrap marker, wrap and turn (W&T), work back to right side wrap marker, W&T. This counts as one “wrap.”

Wrap 2: Work to F*1 sts before left SWM, W&T, work back to right SWM, W&T. (F is the number you filled in on the worksheet).

Wrap 3: Work to F*2 sts before left SWM, W&T, work back to right SWM, W&T

Continue as above, wrapping stitches in multiples of F (see your worksheet).

When you have completed 2/3rds of your wraps, simultaneously start decreasing to reverse the vertical bust darts (see below). Continue until all stitches have been wrapped.

Do Vertical Bust Decreases:

Here you will do the reverse of what you did above for the vertical bust darts. Here is an example:

Round 1: k13, ssk, k to 13 sts before side marker, k2tog, k13

Round 2: k11, ssk, k to 11 sts before side marker, k2tog, k11

Round 3: k9, ssk, k to 9 sts before side marker, k2tog, k9

Continue as above until you have finished decreasing to match the number of vertical bust increases you did before.

A few notes:

For patterns that include guidelines for bust darts, check out my Madame Wu and Celia Cruz patterns.

If you are knitting in the round from the bottom up, you would simply reverse the directions here, first increasing for the vertical bust darts from the side seam or so inwards, then beginning short row wraps (horizontal bust darts), and finally ending with vertical bust decreases moving from inwards out.

Thursday, August 7, 2008

Recycled Plastic Bag Crochet Tote - free pattern recipe

[NOTE: Photographs will be added soon.]

There are a lot of patterns and instructions for recycled plastic bag crochet out there, I'm just adding to the fun with this post and pattern.

This is a bag that I assisted my friend C. in making: a market bag with long straps, made of grocery bags (in white and brown) and target bags (the red speckles).

plastic+crochet+carryall.jpg


There are two reasons to crochet with plastic bags that currently apply to me: (1) because a crafter is on a yarn-purchase moratorium because said crafter's HVAC needs to be replaced, and (2) because a crafter wishes to be eco-friendly in a really flipping fun way.

What you need for plastic bag crochet

1) plastic bags - way more than you think
2) crochet hook - larger the better (within reason)
3) scissors - for cutting plastic bags

Overview

Crocheting with plastic bag yarn is a two-step process. First, you have to make the yarn, then you have to crochet it into a project of your choice. Projects can be bags (a postmodern reconfiguration of a highly wasteful object into one that we dub "eco-friendly"), bath mats, doggie beds, or anything else.

MAKE THE YARN

The yarn-making process involves cutting the bags into long loops of plastic, then threading the loops together to make a two-ply plastic yarn.

Get those bags and a pair of scissors. Lay a bag as flat as possible, then fold the bags in half length-wise twice or three times, until you can cut across the width with one snip of your scissors. First cut across the top to remove the handles. Then, cut across the bottom to remove the base. You now have a plastic tube which you will cut into loops.

A note about gauge

Depending on the size crochet needle you have, and your desired gauge, you can make this yarn thicker or thinner.

Another factor is the heft of the bags you are recycling. Some grocery store bags are much thinning than bags from department stores.

Here's a very arbitrary gauge chart, with suggested needles. The inch measurement refers to the width you will cut your loops:

.5"/thick bag or 1"/thin: Light weight. Size K (6-6.50)
1"/thick or 1.5-2"/thin: Medium weight. Size P hook. (10-11.5)
2"/thick or 2.5-3"/thin: Heavy weight. Size Q hook. (15-16)

When pairing yarn to your hooks, remember the proper pairing depends on (1) your personal crochet tension, and (2) how tight you want the work to be. I would suggest that you work this material tightly, though, to make a stronger fabric.

To attach the loops to make yarn

I know this sounds confusing, but it's a lot easier when you have the yarn in front of you to work with.

Lay one loop on the ground, then lay the second loop on top of it, overlapping slightly. Reach through the top loop and grab the edge of the bottom loop, pulling it through, and then thread this end over the top loop and through itself, i.e., through the bottom loop. Pull tightly, and the loop-over connects the two loops. Continue attaching the loops like this until you have a large ball. (And I mean large--like 1 foot in diameter.)

CROCHET THE BAG

I've prepared a simple bag pattern recipe. This is a tote with handles, not straps like the bag in the picture above.

The pattern presumes that you know how to single crochet flat and in the round.

Work the bottom of the bag

Chain (ch) about 16 inches. This length will be the width of your bag, so chain as many as you want depending on the size bag you would like to make.

Crochet flat with single crochet (sc) for 4-5 inches. This is the depth of your bag. Again, make it as large as you would like.

You will work the sides of the bag in sc. You will now work in the round, around the four sides of the rectangle you just made. As you work in the round, the bag will grow taller. Work for as long as you would like, creating the height of a bag you will want to use--18"-20" is what I recommend.

Work bag handles

First, you need to decide how wide you would like the handles to be.
Second, you need to figure out how to center that width on the width of your bag's long sides.

When you work the handles, you will sc as normal until the start of the handle, then ch as many sts as there are sts for the handle width, then reconnect and sc to the other handle location, repeat handle chain sts, and work to end of round.

The next round you will work in sc including across the chain.
Work in sc until the handle height measures 2-4 inches. Any less than 2 inches may sacrifice handle strength. Wider than 4 inches makes the handles difficult to grab.

You are finished! Tie off, weave in ends using your crochet hook.

Here's a ridiculous schematic I drew. I should stick to CAD software.

Crochet Bag Sketch.jpg

Tuesday, November 20, 2007

Yarn Recycling - Part 2


DSC_0073.JPG, originally uploaded by doctorkrg.

Here's the washed yarn hanging in my bathroom. I've only ripped the front panel of the sweater so far. I have another ball that I haven't washed, composed of short pieces knotted together, in case I need the extra yardage for a project. This yarn, for the most part, is without breaks.

I can't wait to make socks.

Yarn Recycling - Start to Finish

I went to the thrift store yesterday and found this gorgeous alpaca sweater. The sweater itself was a stupid shape, but I had my M.A.P. try it on just in case. But I was right, dumpy shape. So I ripped and ripped it out.

Here's how it started. Look at all of that yummy yarn for $4:


I've only ripped one front panel. There was a lot of loss, so I probably will only end up with about 1000 oz. of yarn, instead of 1500 or so. Darn. 1000 oz. of like-new alpaca for $4.

It's fingering weight, so I'm going to make socks with it. I'll post a follow-up when the yarn is dry and wound, and the socks are WIP.

Thursday, January 5, 2006

Tutorials