There are a number of bust dart tutorials out there, and many of them are wonderful. But it occurred to me that I might provide the instructions from my Celia Cruz pattern here. I find myself turning often the the worksheet I designed for that pattern. Most recently, I've been working on the Backward's Cable Pullover (only my cable is going in the front), and I'm just at the point of adding bust darts. So here's an adapted version of that worksheet, which you can use for any sweater where you'd like a better fit.
The Basics
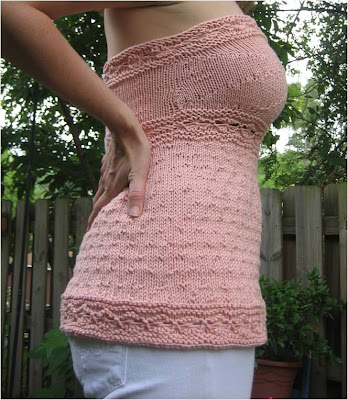
There are two types of bust darts: vertical bust darts and horizontal bust darts. Vertical bust darts add width, and they start from the side seams (or close to the side seams). If you are working top down, you increase one stitch on each side, moving that stitch in towards the center of the sweater. You can see the vertical bust darts in the image below, which create a wedge shape on the side of the sweater.
Horizontal bust darts add length. For vertical bust darts, you will add short rows in the center of the sweater, working back and forth from side to side (usually beginning at or near the bust point).
For a fitted sweater, especially, both kinds of bust darts will help to ensure a good fit.
Sizing: Before you cast on for a sweater, measure your chest size at the narrowest part, above your bust. Choose the pattern size closest to that measurement, not your actual bust measurement. This will ensure that the sweater fits properly in the arms/neck area. You will create more room in the bust area using bust darts.
The Math
To plan out your bust darts, you will need to do a few calculations. (Ask a friend to help you take good measurements, and write them down. Keep these on hand for next time).
Vertical Bust Shaping Worksheet
Fill in the numbers for the following:
A: Size of garment you are knitting (according to pattern measurements): _____ (i.e. 36” size)
B: Your actual bust measurement at fullest point: ____ (i.e. 39”)
C: Difference between A and B: ____ (i.e. 3”)
D: C times the # of stitches per inch in your gauge (i.e. 4.5 stitches): _____. This is the total number of stitches to add in width. (If it’s an odd number, add 1).
E: D divided by 2=____. This is the number of stitches to add on each side.
For example, say I’m knitting a size medium (36”) pattern but my actual bust measurement is 39”. I need to add 3 inches of width. Using my gauge, I calculated that this meant I needed to add 13.5 stitches. I add 14 just to make it an even number, or 7 on each side of my side seam markers. That means 7 rounds of increases. These vertical bust darts will move out on a diagonal from the side seam, to create a pleasing dart line. If you prefer, you can line up the increases above and below each bust point, or simply do them near the side seams.
Work the Vertical Bust Darts into the Sweater Pattern
Work the sweater pattern until it reaches just above the fullest part of your bust. (Try on your sweater frequently so that you don’t start the increases too low).
Begin vertical bust increases (to add width).
Refer to the worksheet, above.
First round: k1, m1, k to 1 sts before side marker, m1, k1.
Following round: k3, m1, k to 3sts before side marker, m1, k3
Round 3: k5, m1, k to 5 sts before side marker, m1, k5
Continue as above until you have added as many stitches as indicated in line E on your worksheet.
If you are working a stitch pattern other than stockinette, you can try to work the increases in somehow. You will decrease at the same point later on. For example, in Madame Wu, I added vertical bust darts by expanding and then decreasing the purl rows in the rib pattern:

Once you are finished with the vertical bust shaping, you will begin the short row shaping. (Or, you can skip to vertical bust decreases, below).
Horizontal Bust Shaping Worksheet (Short Row Shaping)
A: Take your vertical measurement from shoulder to waist:
1. Front: ____”
2. Back: ____”
B: Subtract A2 from A1: ____” (This is how much extra you should add on the front.)
C: Multiply B by the number of rows/inch in your gauge (i.e. 6 rows/inch): ____
D: Divide C by 2: ____ . Add one: _____ This is the number of rows to add (or the number of “wraps”).
E: Try on garment and place markers at apex of each breast (i.e. bust point). These will be your side wrap markers. Take off garment and make sure bust point markers are equally
spaced from side seams.
Count the number of stitches from the side seam to the bust point marker: ____ sts
F: Divide E by D: ___ This is the number of stitches to do between wraps (approximately)—you’ll round up or down.
For example, say I need to add 3” to the length of my sweater. If my gauge has 7 rows per inch, that means I need to add around 10 rows. If I have 25 stitches on either side of my bust point marker, then I’ll work approximately 2 stitches between wraps.
Work the Horizontal Bust Darts into the Sweater
If you have not done short row shaping before, you can look at KnittingHelp.com to see how to do a basic short row.
wrap and turn (W&T): Bring yarn to the front of the work, Sl the next st from the left hand needle, move your yarn to the back of the work, Sl the st back to the left hand needle.
Wrap 1: Work to left side wrap marker, wrap and turn (W&T), work back to right side wrap marker, W&T. This counts as one “wrap.”
Wrap 2: Work to F*1 sts before left SWM, W&T, work back to right SWM, W&T. (F is the number you filled in on the worksheet).
Wrap 3: Work to F*2 sts before left SWM, W&T, work back to right SWM, W&T
Continue as above, wrapping stitches in multiples of F (see your worksheet).
When you have completed 2/3rds of your wraps, simultaneously start decreasing to reverse the vertical bust darts (see below). Continue until all stitches have been wrapped.
Do Vertical Bust Decreases:
Here you will do the reverse of what you did above for the vertical bust darts. Here is an example:
Round 1: k13, ssk, k to 13 sts before side marker, k2tog, k13
Round 2: k11, ssk, k to 11 sts before side marker, k2tog, k11
Round 3: k9, ssk, k to 9 sts before side marker, k2tog, k9
Continue as above until you have finished decreasing to match the number of vertical bust increases you did before.
A few notes:
For patterns that include guidelines for bust darts, check out my Madame Wu and Celia Cruz patterns.
If you are knitting in the round from the bottom up, you would simply reverse the directions here, first increasing for the vertical bust darts from the side seam or so inwards, then beginning short row wraps (horizontal bust darts), and finally ending with vertical bust decreases moving from inwards out.
11 comments:
wow, thanks for this really helpful tutorial. I really appreciate that you explain what the different darts will accomplish.
Hi there! I can't believe I am just now finding your blog, it's fantastic. This tutorial on bust darts is the best one I've come across. I have a couple of questions. In the instructions for Vertical Darts:
"First round: k1, m1, k to 1 sts before side marker, m1, k1.
Following round: k3, m1, k to 3sts before side marker, m1, k3
Round 3: k5, m1, k to 5 sts before side marker, m1, k5"
I'm doing a top down cardi in one piece. Is the "following round" the wrong side of my sweater or the next right side? And do I start right at the beginning of the row with the first K1, M1?
Also, I have a very small frame with C cups (TMI?). Do you think I need to do both types, vertical & horizontal?
Thanks so much for your help. I'll keep reading your fabulous blog.
Andrea,
Since you are knitting back and forth and not in the round, I would do the bust increases on every other row (RS only).
For a fitted sweater, I think both kinds of darts are useful, especially if you have a small frame. Darts will allow you to choose a size that fits your frame (i.e., the above bust measurement) and then customize it, rather than ending up with a larger size that is too big in the shoulders.
However, vertical bust darts are the easiest to start with, and I think you'll see a notable difference if you try those first.
Oh, and for a cardigan, you'll want to find the side seams and make the increases work outwards from those--i.e., knit to 1 st before side seam marker, m1, knit to 1 st after 2nd side seam marker, m1, knit to end of row.
On the next row, you'll work to 3 st before side marker, and keep increasing that number until you've added all your increases.
Thanks so much Jordynn. This is going to make a huge difference in my sweater knitting. :)
Am I being stupid or do either of the pictures actually show the vertical decreases? I want to knit a sweater with a dart under the bust but without any increasing (aside from the short row shaping) and am having a headache trying to work it out!
The vertical increases and decreases form the V shape that you see in the picture of the pink sweater above.
Thank you so much for posting this excellent tutorial! I just finished making my first sweater and am happy with everything except the bust area (DDD will do that to ya) so was looking for a way to ensure I would be happier with my next sweater. I can't wait to try these darts to see how much of a difference they make!
Having narrow shoulders and a DD bus, this article has saved my sweater life!!! Thank you!!!
This post is really helpful. My bust is just big enough that I need to add about an inch to everything I knit. I've got full bust adjustments mastered in sewing, but find them far more difficult in knitting, because of all of the math involved. Your tutorial makes it far easier than anything else I've read. I'm about to start a pullover, and this will be really helpful. Thank you!
www.aspiringthreads.ca
Thanks for the bust dart instructions, they worked well. But I think you have an error in the vertical decreases - the number of stitches to knit before the side marker should be increased by two:
For example, you have:
"k13, ssk, k to 13 sts before side marker, k2tog, k13"
If you knit to 13 sts before the side marker and then k2tog, there are only 11 sts left. I believe it should be "k to 15 sts before the side marker". (Same for the remaining examples.)
Post a Comment